You’ve got an old house. It’s beautiful, but it has its issues. When you bought it last year, you knew that there would be some renovations to do. The first thing on your list was getting new windows installed in order to improve energy efficiency and get rid of drafts. You called around to different companies for quotes and landed at one that seemed like a great fit—except for one small detail: they didn’t seal up the old windows after installing them.
This meant that the cold air from outside could still come into your house through cracks around your frames! You decided not to use this company anymore after that discovery, but they weren’t alone in making this mistake when replacing old windows with new ones: many companies just don’t know how important it is to take precautions like these when doing any type of home improvement project involving any kind of building materials whatsoever.
Here’s how to replace your windows the right way.
Complete Removal Of Existing Windows
First, you remove the existing windows and once the old windows have been removed and you’ve cleaned up the remaining debris, you begin installing your new replacement windows. The process begins with the complete removal of all hardware, trim, siding, and interior trim. This includes:
- Removing all existing window frames (this can be done using a reciprocating saw)
- Removing all caulking or sealant around the window frame (you can use an electric chisel if necessary)
- Removing any interior drywall that may need to be cut through in order to remove the window frame (you may also need to use an electric chisel for this task)
- Removing any insulation which may still exist between side wall studs and/or joists—this is usually fiberglass insulation; however, there are other types available on modern homes like polystyrene foam board or spray foam insulation
- Disconnecting any electrical wiring that runs from your house’s main panel box into each wall cavity where these wires enter from above through holes drilled into top plates of walls at corners; these holes will no longer be needed as there will now be nothing inside each cavity except for two-by-four studs holding up roof rafters above
Remove Window Sash And Clean
The next step is to remove the old window sash. This can be done with a few simple tools and doesn’t take a lot of time, but it does require some careful attention. You don’t want to damage the window frame or door while removing the old glass pane, so make sure you have a good set of screwdrivers and other bits on hand before taking this step.
Next comes cleaning out the opening and inspecting it for damage. The space between your home’s walls and windows should be properly caulked before hanging new ones in there to make sure water doesn’t get into your house when it rains or snows outside! We’ll show you how we do that by applying new flashing material directly over where your old one was put down previously; this helps prevent any leaks from happening during windy days too!
Inspect And Caulk Opening Where Needed
Now you’re ready to inspect the opening where you will install your new windows. Your goal is to be sure that the opening is in good condition and that it is sealed properly so that there are no air or water leaks. If you live in a cold climate, you might also want to check for damage caused by rodents (e.g., mice), rot and termite damage as well as any moisture penetration from rain or snow meltwater.
If you have an older home, chances are there’s quite a bit of paint on these windows already—and if so, removing it all can get messy! That’s why we recommend hiring a pro for this part of the project. And It’s here where we can help you as we can help remove the old paint without damaging anything underneath it and allow you to focus on the next step.
Apply New Flashing Material On Bottom Rail Or Header
Once the window is in place, you’ll need to apply flashing material to the bottom rail or header. Flashing is a waterproof barrier that prevents water from entering the building through crevices between the window and its frame. If you ever notice water coming into your home around windows, check for missing flashing material.
The most common type of flashing material is made from aluminum and comes in rolls about three feet wide by 15 feet long. Cut pieces of flashing material with tin snips or scissors and make sure they are long enough so that they overlap on all sides by at least two inches (measurements may vary depending on each installation). Wrap one end around each side of your window casing using sheet metal screws before folding them over onto themselves so they fit snugly against one another when screwed together
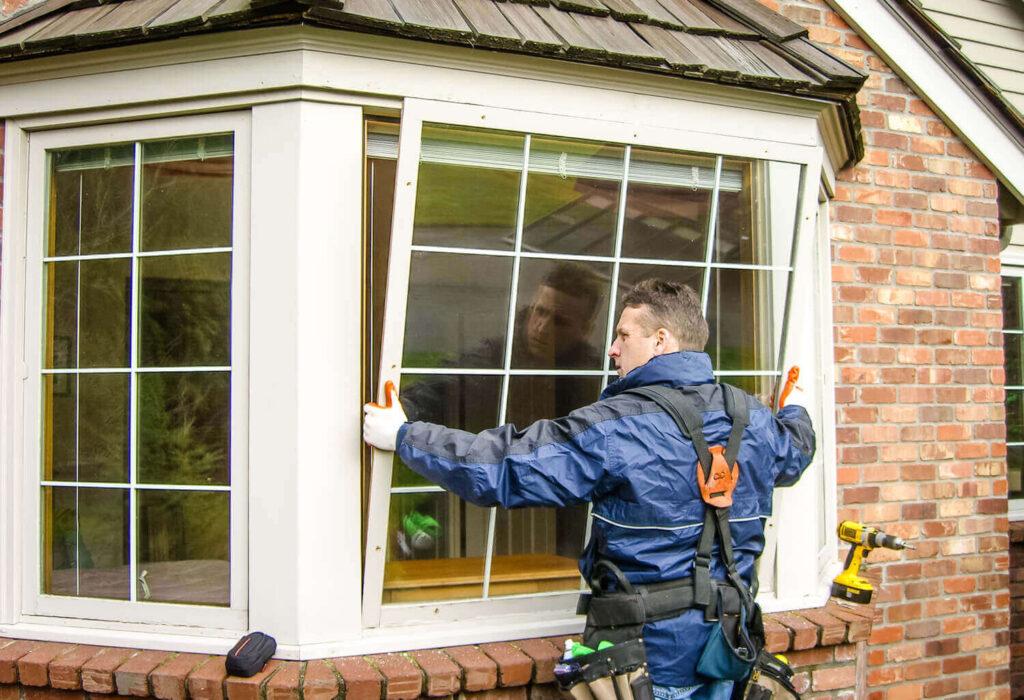
Install New Window From Outside To Inside, Bracing When Necessary
When installing new windows from the outside to the inside, you should brace them when necessary. If your window is too large or heavy for one person to handle safely and easily, it will need some extra support in order to remain upright while being installed. A simple wooden board can be used to brace the window as it’s being placed into place, but if you’re up against a budget or prefer metal, metal braces can also do the job. The strength of either option depends on how much weight they’ll have to support during installation; lighter materials like wood are obviously more susceptible than heavier ones such as steel when it comes time for them to bear significant loads.
Bracing should always be done with screws rather than nails if possible; nails tend not only to cause damage when removed later on but also create much more noise during installation (which is something we try our best at avoiding here at Exterior Point Home Remodeling).
Square-up And Nail-off Window Box
When it comes to replacing your windows, many of our customers wonder how to properly install a window box. A window box is typically installed above the window frame and is used to conceal any exposed space between the wall and window.
We’ll walk you through the step that is needed to install a square-up and nail-off window box:
First, you need to level your new window with respect to gravity by using a spirit level (or other similar device). If you don’t have access to one of these tools at home, you can use simple math—one way would be measuring 15 feet from your house and then marking that spot as “zero” on your tape measure so that all measurements will be relative from there. Once you’ve leveled out with gravity, draw lines perpendicular off this line so they meet at 90 degrees (aka right angles). These lines will then form four quadrants that represent each side of your new window’s footprint on paper—you’ll want them all equal distances apart (measured in feet) and parallel with each other along both axes. This ensures proper alignment when installing trim boards later!
Apply Expanding Spray Foam Insulation To Any Gaps Greater Than 0″
If your windows are in good shape and you’re just looking to make them more energy efficient, then the best thing to do is apply expanding spray foam insulation to any gaps greater than 0″. Spray foam is a great way for homeowners to seal areas that are hard to reach and will last longer than other types of insulation. It provides continuous air sealing, which keeps your house cool during the summer and warm during winter months.
Rough In Interior Trim And Finishing
Trim can be made of wood, vinyl or metal, and should match the rest of your home. It can be painted or stained.
Vinyl windows have a flange that sticks out about 1/4″ from each side of the window frame (this will keep moisture from getting behind them). The recommended installation process for these types of windows involves cutting this flange off before installing into the opening between framing members. You’ll want to make sure there are no obstructions between where you’re going to install your new window (e.g., joists) so that you don’t accidentally cut yourself when doing this step!
How we can help you with insulating your home.
At this point, if everything is done properly, there is 1 thing left to worry about: Insulation. It’s hard to properly do this yourself as a lot of things can go wrong. Which is why we don’t just put in new windows but seal them for our customers. This is to ensure our customers home’s are insulated properly. Hiring a professional is important as doing it yourself can carry dangers with it. Here’s why:
- Windows take up a lot of space on the inside of your house and can act as a giant heat drain if they’re not insulated properly. When it comes to insulation, there are two main types: glass fiber and foam-injected cellulose (or “fiberglass”). Both insulate against air infiltration by filling the spaces between panes with either glass fibers or recycled newspaper particles, respectively. We would choose the right material for your windows and seal them.
- Sealing windows is essential for keeping out drafts, so we use high quality weather stripping around frames that can be removed easily without damaging paintwork or other finishes inside the home. This helps keep cold windy air from getting into cracks around window frames while still allowing cool breezes through when needed!
Conclusion
We hope you have enjoyed reading about our process for installing new windows. We take pride in our work, knowing that it makes your home look better and more energy efficient. If you are interested in any of the services we provide at Exterior Point Home Remodeling, contact us here!